Monday, February 08, 2016

OpenDayLight Framework information

The domain is called SDN (Software Defined Network). Traditionally the networking devices have routing logic and controlling logic as well built into the hardware device(with software built into them). SDN takes away the controlling and additional responsibilities into application layer while the physical network still focus on the core functionality (data forwarding).
mvn archetype:generate -DarchetypeGroupId=org.opendaylight.controller -DarchetypeArtifactId=opendaylight-startup-archetype -DarchetypeVersion=1.1.0-SNAPSHOT -DarchetypeRepository=http://nexus.opendaylight.org/content/repositories/opendaylight.snapshot/-DarchetypeCatalog=http://nexus.opendaylight.org/content/repositories/opendaylight.snapshot/archetype-catalog.xml

wiki.opendaylight.org
CCFT Facts: Project Creation Date: January 8th, 2015 Lifecycle State: Incubation Primary Contact: Keith Burns Project Lead: Tom Pantelis ...


You can download VM that has eclipse and other stuff installed already. This is a ubuntu VM. 
To import an appliance in one of the above formats, simply double-click on the OVF/OVA file.[7] Alternatively, select "File" -> "Import appliance" from the Manager window. In the file dialog that comes up, navigate to the file with either the .ovf or the .ova file extension.


Java


We don't need to setup system by ourself in the beginning, the VM image from the site allows you to download ubuntu desktop version image.

since i have less RAM, I needed to modify the setting of the VM to 1.2G RAM from its 2GB ram (TOtal i have is 4GB running win 7)

YangTools


In case if you have any difficulty with maven version (ubuntu has 3.0.5 as default where as ODL needs 3.3.1 onwards, so we can download the maven zip file and unzip and then link it to mvn so that it ODL compilation will not have any problem.


        sudo apt-get remove maven
        sudo mkdir -p /opt/maven
        cd /opt/maven
        sudo tar xvzf apache-maven-3.3.9-bin.tar.gz
        sudo ln -s /opt/maven/apache-maven-3.3.9/bin/mvn /usr/local/bin/mvn


Networking concepts


SDN terminology:
http://www.cse.wustl.edu/~jain/cse570-13/ftp/m_16sdn.pdf

SDN for dummies, simple book
http://www.cisco.com/c/dam/en/us/solutions/collateral/data-center-virtualization/application-centric-infrastructure/sdnfordummies.pdf


http://events.linuxfoundation.org/sites/events/files/slides/odlsummit15_dmitriy_mirantis_081215.pdf 

http://www.fujitsu.com/global/documents/about/resources/publications/fstj/archives/vol49-3/paper07.pdf

https://www.infinera.com/wp-content/uploads/2015/07/Infinera_TP_Paving_the_Path_to_Multi-_Layer_Networking_via_SDN.pdf

Saturday, February 06, 2016

java.lang.String out of START_OBJECT token

If you are developing new spring rest services and encounter the following issue


Feb 06, 2016 10:17:05 AM org.springframework.web.servlet.mvc.support.DefaultHandlerExceptionResolver handleHttpMessageNotReadable
WARNING: Failed to read HTTP message: org.springframework.http.converter.HttpMessageNotReadableException: Could not read document: Can not deserialize instance of java.lang.String out of START_OBJECT token
 at [Source: java.io.PushbackInputStream@353e55b8; line: 1, column: 1]; nested exception is com.fasterxml.jackson.databind.JsonMappingException: Can not deserialize instance of java.lang.String out of START_OBJECT token

 at [Source: java.io.PushbackInputStream@353e55b8; line: 1, column: 1]


{
   "user": {
      "organizationId": 1,
      "roleId": 1,
      "statusId": 2,
      "email": "test@test.com,
      "password": "admin"
   },
   "person": {
      "firstName": "",
      "lastName": "",
      "phone": "",
      "mobile": ""
   }
}


The resolutions could be:

  • Your JSON request is invalid, check if it is complete and correct. 
  • You configured the spring mvc correctly.
  • You have required POM depedencies configured.
  • Your annotations are correct. @RequestBody is an important tag. 

               @RequestMapping(method = RequestMethod.POST,value = "/test")
  • public Response testData(@RequestBody TestData request){
    Response response = Response.positiveResponse();
    return response;
    }

Wednesday, January 27, 2016

Configuring tomcat7 with SSL

Recording steps that worked for me.  the certificate was created using letsencrypt


The generated files in the directory with keys are :


cert.pem  chain.pem  fullchain.pem  privkey.pem  

now, using openSSL converted the certificate to p12 format.

openssl pkcs12 -export -in cert.pem -inkey privkey.pem -out cert_and_key.p12 -name tomcat -CAfile chain.pem -caname root

(it will prompt you to input password, please provide, i found it not working while importing to java keystore without password to the p12 file)

Import to java keystore

Let us import it into a keystore file (KeyStore.jks), please make sure you provide the same password chosen in the previous step. Also it will prompt for keystore password, please provide one.

 keytool -importkeystore -deststorepass CHANGEIT  -destkeypass  CHANGEIT-destkeystore KeyStore.jks -srckeystore cert_and_key.p12 -srcstoretype PKCS12  -alias tomcat
Enter source keystore password:

Not sure if its mandatory but needed to execute the following too.

keytool -import -trustcacerts -alias root -file chain.pem -keystore KeyStore.jks


Tomcat configuration

Now

Let us configure the tomcat server.com (in /etc/tomcat7/server.xml)  add this after the http connector (80 port).


<Connector port="443" protocol="org.apache.coyote.http11.Http11Protocol" maxThreads="150" SSLEnabled="true" scheme="https" secure="true" clientAuth="false" sslProtocol="TLS" keystoreFile="/usr/share/tomcat7/certs/KeyStore.jks" keystorePass="CHANGEIT" keyAlias="tomcat" keyPass="CHANGEIT"/ >


Please make sure you are providing the path and the passwords specific to your application server. the keystore (.jks file) should be in accessible location. 

Thursday, January 14, 2016

Virtual Box Ubuntu configuring and connecting through ssh from host machine


The best way to login to a guest Linux VirtualBox VM is port forwarding.


 By default, you should have one interface already which is using NAT. Then go to the Network settings and click the Port Forwarding button. Add a new Rule:
Host port 3022, guest port 22, name ssh, other left blank.
or from command line
VBoxManage modifyvm myserver --natpf1 "ssh,tcp,,3022,,22"
where 'myserver' is the name of the created VM. Check the added rules:
VBoxManage showvminfo myserver | grep 'Rule'
That's all! Please be sure you don't forget to install an SSH server:
sudo apt-get install openssh-server
To SSH into the guest VM, write:
ssh -p 3022 user@127.0.0.1

Monday, January 21, 2013

Google code password


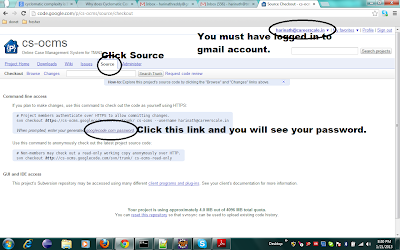
Often some our our students have problem in understanding which password to be used for committing changes to a google code project.  Here is how you can get your google code generated password.  You can regenerate if you want to.  Remember this password is different from your regular gmail password and shouldn't be confused with.  Hope This clarifies confusion around password to google code.


Thursday, September 22, 2011

Planning for failure

Process in IT companies looks a very ambiguous word. What looks fine in one company may not be acceptable in another company.  I come across this site http://www.planningforfailure.com which  compared the agile/Scrum with Kanban/Lean startup. It is an interesting read. Also the links mentioned in the blog are good. 

I also like the definition of a hacker.
"Someone who thinks outside the box. Someone who discards conventional wisdom and does something else instead. Someone who looks at the edge and wonders what's beyond. Someone who sees a set of rules and wonders what happens if you don't follow them. - Bruce Schneie" 

from http://www.thehackerchickblog.com/ 


Saturday, February 05, 2011

Debug maven application with jetty plugin

Have the jetty plugin configured.
<plugin>
<groupId>org.mortbay.jetty</groupId>
<artifactId>maven-jetty-plugin</artifactId>
<version>6.1.12</version>
<configuration>
<scanIntervalSeconds>10</scanIntervalSeconds>
<connectors>
<connector implementation="org.mortbay.jetty.nio.SelectChannelConnector">
<port>8888</port>
<maxIdleTime>60000</maxIdleTime>
</connector>
</connectors>
</configuration>
</plugin>

After that It’s time to configure eclipse for debugging the web app by selecting the Run > Debug … from the menu
# Set Main Class to "org.codehaus.classworlds.Launcher"

Go to the argument tab:
# Set Program arguments to "jetty:run"
# Set VM arguments to "-Xmx512M -Dclassworlds.conf=[MAVEN_HOME]/bin/m2.conf -Dmaven.home=[MAVEN_HOME]"
(Replace MAVEN_HOME with the location of maven on your system)

Go to the classpath tab:
# remove the application from the user entries
# add the "[MAVEN_HOME]/lib/classworlds.jar" to the user entries. in case if the classworlds.jar have version number in the name, please include. Essentially we need to add the correct jar to the classpath

Go to the source tab:
# add the current project to debug

Now you can start debugging your application like you do it always

It is very interesting to set the –o option to the maven command in order to accelerate the fix/debug process.